Pages

Friday, January 28, 2011

Sugar Challenge


I was a sugar addict.  It started innocently enough as a small child.  A chocolate donut from the local bakery on Saturday morning, a swig of cherry Kool-Aid on a hot summer afternoon, a bowl of colorful Trix cereal washed down with cold milk before school.

Sugar was just as common as salt and pepper.  It sweetened up those apple pies my mom baked in the fall.  It decorated the tops of snickerdoodle cookies.  It had its own rightful place in the sugar bowl, where adding an extra spoonful of sugar certainly did help the medicine go down!

Little did I know sugar was like a slow drip of arsenic, poisoning my body and creating an addiction that could rival anyone at the Betty Ford Center.  (Want to know about the damage sugar does to your body?  Read my notes on Facebook.)

I have vivid memories of my first job at Safeway.  I was completely unaware that I had a sugar problem, though each day on my break a jelly donut and a 3 Musketeers Bar found its way into my stomach.

More vivid memories of being a 6th grade school teacher.  Still unaware of my sugar addiction, I spent each night lying in bed reading a book while scarfing down half a bag of cookies and sipping nighty night tea wondering why I had insomnia.

And still more memories of homeschooling my children.  Heaping spoonful after spoonful of sugar into cups of coffee, then frantically drinking the elixir down as a heroin addict frantically finds a fix.

Making the decision to eliminate sugar from my diet was one of the most difficult challenges I've ever faced in my life.  Sugar, once it knows you are ready to sever ties, goes into overdrive and creates uncontrollable cravings that even Super Woman couldn't conquer.  I battled with sugar for years!  At times having conquered the invader and at other times caving in like Whole Foods acquiescing to Monsanto.

It wasn't until I started school at Institute for Integrative Nutrition that I finally got a handle on the sugar.  Through patience, determination, better food choices, deconstructing the cravings and lots of support from my fellow students, I found the sugar cravings slowly diminishing while my mood and energy improved and my belly didn't hurt anymore!

But now even with my arsenal of natural and alternative sweeteners, I am dismayed and disgruntled by the sugar content found in the most basic of foods.  Ketchup, mayonnaise, salad dressings, BBQ sauce.  You name it, it probably has sugar in it.  Even the organic products at the health food store are loaded with sugar!  Though I may not want sugar in my life, the food industry seems to think it should be!

So my Sugar Challenge has begun.  I am on a mission to continue eliminating sugar from my life and my pantry.  By finding products made without sugar or just learning to make them on my own, my goal is to be truly sugar free. 

Will you to join me?


How has sugar affected your life?

Monday, January 24, 2011

Homemade Granola

Every once in a while I'll get a craving for some granola.  Crunchy, a little sweet and full of my favorite nuts and dried fruits.  But unfortunately most granolas in the store are full of sugar.  Drat that sugar!  So I decided to just make my own.  I mean how hard could it be?  Here's the recipe:

Homemade Granola
  • 2 cups old fashioned rolled oats, organic please!
  • 1/2 cup unsweetened shredded coconut
  • 1/2 cup sliced almonds, go ahead throw in some other favorite nuts too, like chopped pecans
  • 2 tbsp coconut oil
  • 2 tbsp honey
  • 1 cup dried cranberries or your favorite dried fruit or even a combo!
  1. Preheat oven to 350*  On a large rimmed baking sheet, toss oats, coconut and almonds.
  2. In a small saucepan, melt coconut oil.  Remove from heat and stir in honey.
  3. Pour over oat mixture and toss.
  4. Bake, stirring occasionally, until lightly toasted, 20-30 minutes
  5. Place mixture in a large storage bowl and stir in cranberries.  Make sure to let the granola cool completely before storing. 

Fresh from the oven granola


My favorite way to eat this granola is just like a bowl of cereal with some fresh raw milk.  It also tastes divine sprinkled in yogurt or cottage cheese.  For a snack, cut an apple or banana in half and spread with peanut butter, then add granola on top for a fun treat.  Granola can also go with ice cream or frozen yogurt and is really good stirred into a fruit salad.


Storing the granola


It looks so pretty, I couldn't stop taking pics!


How do you eat granola?

Wednesday, January 12, 2011

Kombucha

Back in oh about the year 2006, a friend handed me a book called Nourishing Traditions by Sally Fallon.  Upon reading that book, my entire view of food was radically altered and a new direction in my kitchen was laid open before me.

My passion for food and science were fueled by new concepts I had never heard of before:  sprouting?  fermenting?  What is that all about?  I embodied the mad scientist as jars of kefir and kombucha, beet kvass and sauerkraut, sprouting seeds and soaking legumes filled my counter tops.  My friends and family eyed me suspiciously as they lovingly yet apprehensively drank or ate my many concoctions.

Once such concoction which made many squint with disgust and curiosity was my kombucha.  What on Goddess's Green Earth is growing in that jar!  Oh yes, the SCOBY, the mother of the kombucha.  Yes, my friends it looks like a wicked jelly fish or something from a late night horror movie, but that scoby makes the most delicious and nutritious beverage. 


Kombucha Scoby


SCOBY stands for symbiotic colony of bacteria and yeast.  It is also called a mushroom.  The bacteria and yeast feed on the sugar and tea to create acetic, lactic and glucuronic acid and a host of antioxidants, vitamins, and probiotics.  All of which boost the immune system, aid the body's natural cleansing processes, and have said to help in cancer prevention. 


Kombucha
Makes about 2 quarts

  • 3 quarts filtered water
  • 1 cup organic white sugar
  • 4 tea bags of organic black tea
  • 1/2 cup kombucha from a previous culture
  • 1 kombucha SCOBY
  • a large glass jar
  1. Bring 3 quarts filtered water to a boil.  Add sugar and simmer until dissolved. 
  2. Remove from the heat, add the tea bags and allow tea to steep until water has completely cooled. 
  3. Remove tea bags.  Pour cooled kombucha into a large glass jar.  Add previous kombucha culture.  Place scoby on top of the liquid.  Cover loosely with a cloth towel or cheesecloth. 
  4. Transfer kombucha to a warm place, usually the kitchen counter is just fine.  In about 7 to 10 days the kombucha will be ready, depending upon the temperature of the room.  The warmer the temperature the quicker the kombucha will ferment.  The kombucha should be sour and somewhat fizzy, with no taste of tea remaining.  In the winter my kombucha takes closer to 14 or 16 days.
  5. Transfer your kombucha to storage jars/bottles and refrigerate.

Your kombucha will grow a second scoby.  This can be used to make more batches of kombucha or given away to friends.  Store extra scobys in the refrigerator in glass jars when not using.  A kombucha scoby can be used dozens of times.  If your scoby becomes black or your kombucha doesn't sour properly, it is contaminated.  Throw it out and get a new scoby.


2  jars of Kombucha fermenting


So where in the world do you get a scoby?  It's not like your local grocery store has then hanging out with the lettuce in the produce section!  You have to find someone living near you that is making kombucha and can give you one.  There are online businesses that sell scobys.  Or you can go to the Weston A. Price Foundation.  Click on "Find a Local Chapter."  Find your state and look for a group in your area.  Call that person up and they can tell you where to get a scoby.  For me, part of the fun of kombucha is passing the baby scobys along to a new home.  So if you live near me, you can bet I'll have a scoby for ya.  Free of charge!


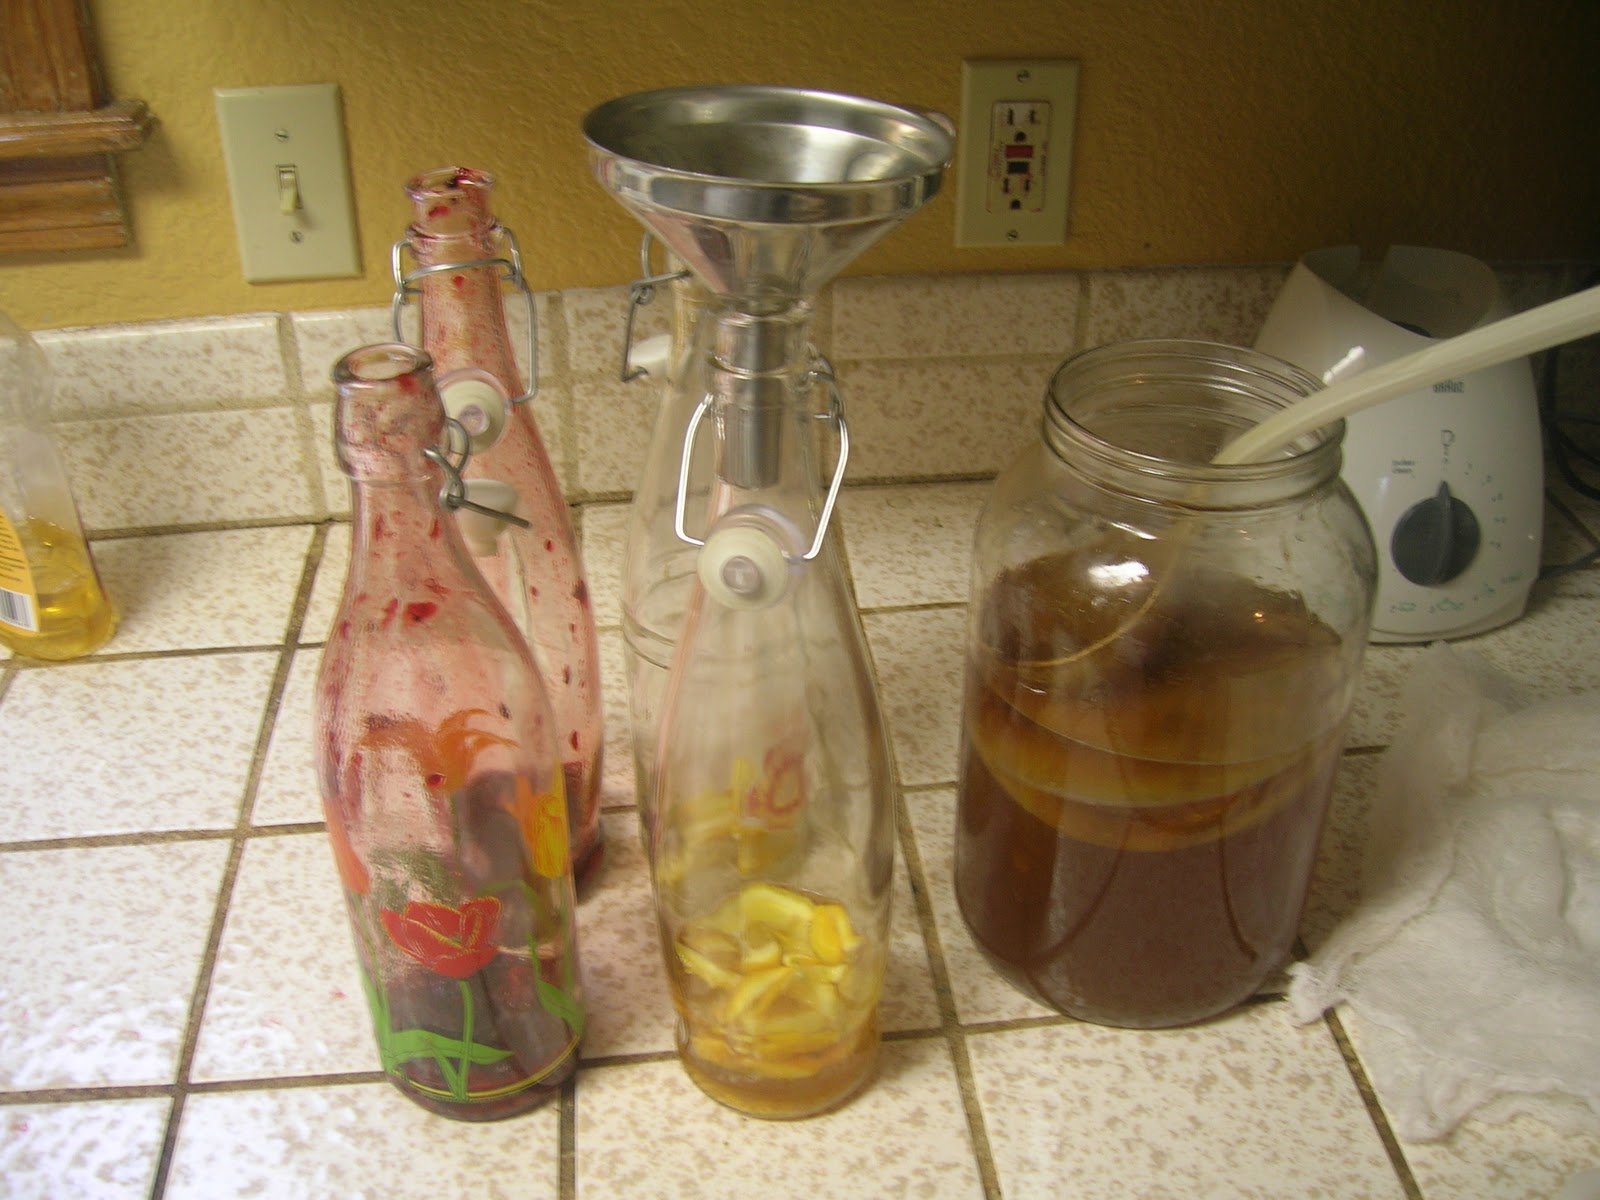
Bottling the Kombucha

And kombucha is very versatile.  In fact it is quite fun to experiment with different teas.  Though black tea creates the highest amount of glucuronic acid, other teas will create their own unique flavors.  Though I caution to always use organic tea.  Non-organic tea is high in flouride, something we don't want in our kombucha.

Adding fruits and whole spices mixes up the fun too.  After you've bottled your ready to drink kombucha, add some fruit for some variety.  My current favorite is lemon and mixed berry.


Bottled Lemon and Mixed Berry Kombucha


Our love of kombucha continues to grow and so do the jars on my counter!

So cheers to kombucha, your good health and inspiration in the kitchen!

Friday, December 31, 2010

Spinach Mushroom Pesto Quiche

I've never been an appetizer making kind of gal.  Putting together tiny little bites all decorated fancy has never been part of my skill set.  The idea of appetizers makes my mind go blank and a question mark appears on my wrinkled forehead.  I'd rather make meals.  Meals I can sink my teeth into.  Meals that fill my tummy.  Appetizers baffle me.

I made the intention back in November that I was going to allow more fun into my life and within a few week's time, I was invited to 3 partys.  Two of which require of all things ~ appetizers.  I pulled out my Martha Stewart cookbooks, knowing the Queen of All Things Domestic would surely have crowd pleasing appetizers, but the assembling of these dainty treats certainly did nothing to please me!

Then I remembered a quiche that I love, a quiche I haven't made in quite a long time!  Certainly I could turn that quiche into appetizer bites by cutting it into little pieces!  Appetizer problem solved!  This recipe comes from the Joshua Grindle Inn in Mendocino CA. 

Spinach Mushroom Pesto Quiche
  • 1/2 cup polenta
  • 1 1/2 cup water
  • 1/4 + 1/4 cup grated Parmesan cheese
  • 2 tbsp fresh pesto
  • 1 cup shredded mozzarella cheese
  • 1 cup mushroom, sliced thinly
  • 1/4 cup sun dried tomatoes (no oil) chopped
  • 3 cloves garlic, minced
  • 3 eggs, beaten
  • 1 1/4 cup milk
  • 1/2 cup cottage cheese
  • 5 oz spinach, steamed and drained
  • 1 Roma tomato, sliced thinly (optional and if in season)
  1. Preheat the oven to 350 degrees.  Lightly oil the bottom of one pie plate.
  2. In a small saucepan, mix water and polenta and bring to a boil.  Reduce heat and stir until thickened.  Add 1/4 cup Parmesan and salt and mix well.
  3. Pour into pie plate covering bottom.  Let cool until solidified, about 5-10 minutes.
  4. Spread pesto over polenta and sprinkle with mozzarella. 
  5. Saute mushrooms, garlic, and sun dried tomatoes.
  6. Beat together eggs, milk and cottage cheese.  Add sauteed mushroom mixture and spinach.  Mix well and pour into pie plate.  Sprinkle with 1/4 cup Parmesan and decorate with tomato slices.
  7. Bake for 45 minutes until center is set.

Spinach Mushroom Pesto Quiche


Yummo!  The perfect quiche for any occasion!

I usually am a dairy free girl, except for raw milk and my homemade raw kefir, but this quiche is so delicious that I occasionally allow myself a dairy splurge.  90/10 is my motto.  If 90% of the time I am eating good healthy food, that 10% won't do me in, hopefully! 

Happy New Year everyone, I wish you the best of health this coming new year and may your meals be delicious, healthy and full of love!

Sunday, December 26, 2010

Preserved Lemons

Along the highway leading out of Valley Springs and into the central valley of California, is a little farming town where my mom went to high school.  And in that little town is a little library with a little parking lot.  And in that little parking lot are 4 trees growing wildly happy and full of fruit.  One orange, one lemon, one grapefruit and one blood orange.

And so I made the trip to that tiny little town and marveled at the bounty hanging from the branches.  With great appreciation those trees shared their fruit and I filled my paper bags, all the time wondering what fun I would soon be having in my kitchen.

Along the highway I made my way home to my own little town and my cozy house with its little kitchen.  And in my little kitchen I dumped those delicious looking lemons into the sink, gathered my sea salt, a large jar and a knife.

And what do you think I made?

Preserved Lemons
  • Lemons, Meyers I hear work best but these were a gift from Mother Nature so I won't complain
  • Sea salt
  • Large glass jar
  • Knife
  • Bowl
  • Something to smash the lemons with
  1. Scrub and clean the lemons
  2. Cut each lemon into fourths but do not cut all the way through.  The four quarters of the lemon should still be attached at the bottom.
  3. Pour some salt into the bottom of the jar, about 2 tbsp
  4. Sprinkle salt into each lemon covering the quarters
  5. Add a layer of lemons into the jar, sprinkle with salt and then smash!  Smashing the juice out of the lemon.
  6. Add another layer of lemons, sprinkle once again with salt and then smash!
  7. Continue until entire jar is filled.
  8. Sprinkle one last spoonful of salt over lemons
By now there should be quite a bit of lemon juice on the bottom of the jar.  More juice will seep from the lemons as the salt does its work.  Place jar on counter in a warm place and each day for 30 days shake your jar to mix up the salt and lemon juice.  To use your lemons, rinse the salt off the lemon and serve as needed.  These lemons can keep up to a year and do not need to be refrigerated.


Preserved Lemons

Serve your preserved lemons with Moroccan recipes here.

One little bag of lemons preserved, one little bag of oranges left dreaming of their destiny.

Butternut Squash Soup (for minimal cooking nights)

Sometimes even I, the Kitchen Witch, doesn't feel like cooking.  There are those rare days when I just want someone else to serve me some delicious food that I didn't make.  Sometimes I dream of fabulous food just magically appearing on my plate without my having to lift a finger.  And of course the dishes wash themselves!

Though I avoid processed pre-made food like the plague, every once in awhile I allow myself a little convenience.  But even then I'm careful with what I buy.  On a recent trip to one of my favorite stores, Trader Joe's, I was feeling a little cranky and not at all wanting to be in the kitchen.  A box of Butternut Squash Soup caught my eye, so I'd thought I'd give it a try.  But of course even when I'm cranky, I can't help mixing things up a bit!

Trader Joe's Butternut Squash Soup

A bowl of plain soup with no texture sounded a little blah, I wanted some heartiness, so I gave my Butternut Squash Soup a little umph! 

Here's my version of Trader Joe's Butternut Squash Soup:

  • Half a box of Trader Joe's Butternut Squash Soup
  • 2 slices of good quality bacon, fried and crumbled
  • 1 small yam, diced into small chunks
  • 1 small bunch of cilantro
  • Tbsp butter
  • Dash of cinnamon
  • Salt and pepper
  1. Place diced yam into a skillet on medium heat and sautee in butter until yam is soft.  Season with salt, pepper and some cinnamon
  2. Fry bacon, drain on paper towel, then crumble
  3. Warm up soup in a pot
  4. Chop cilantro
Pour soup into bowl, add cooked yams, sprinkle with bacon and cilantro.

Trader Joe's Butternut Squash Soup my way
It turned out delicious!  So delicious I thought I'd share it with you.  And if you don't have a Trader Joe's near you, use your favorite brand of Butternut Squash Soup, just be careful of the ingredients!

Feel like making your own Butternut Squash Soup?  Click here for a yummy recipe from Epicurious.  I personally leave out the brown sugar.  If you want to add some sweetness to this soup, add a little orange juice.  To tart it up, add a chopped green apple to the pan while sauteing the onion.

It will be about another month before I have that "I want nothing to do with the kitchen" feeling.  I'm excited to discover another "convenience" that I can easily make my own. 

In what ways to you let "convenience" into your kitchen?

Saturday, December 18, 2010

Persimmon Cranberry Sauce

When was the last time you ate cranberries?  Was it Thanksgiving Day with the turkey and stuffing?  Cranberries seem to get all the love and attention they deserve on that holiday of thanks, but what about the rest of the season? 

Sure we often chug down some cranberry juice and dried cranberries ocassionally make it on top of our hot cereal and into our trail mix, but these little red berries deserve much more attention than we give them.

In my quest to eat seasonally, I am now tracking down these little red berries and creating tasty treats in the kitchen. Fresh cranberries are available in stores mid-September through December and can be stored in the refrigerator for up to four weeks.

 
Cranberries:
  • are high in Vitamin C and fiber
  • prevent urinary tract infections
  • may prevent ulcers and gum disease


Bright berries getting a bath
 
 Persimmon Cranberry Sauce
  • 3/4 lb fresh or frozen cranberries (3 1/2 cups)
  • 1/4 cup dry red wine
  • 2 tablespoons water
  • 1/2 star anise or 1/4 teaspoon star-anise pieces
  • 1/2 cup Agave Nectar or Brown Rice Syrup
  • 3 firm-ripe Fuyu persimmons (about 1 lb total), peeled and cut into 1/4-inch dice

  1. Bring cranberries, wine, water, star anise, 1/2 cup sugar, and a pinch of salt to a boil in a 2-quart heavy saucepan, stirring occasionally, then reduce heat and simmer 5 minutes.
  2. Add more sugar, to taste (up to about 2 1/2 tablespoons), and discard star anise.
  3. Fold in persimmons.
  4. Transfer to a bowl and serve at room temperature or chilled.
  5. Stir gently before serving.


My sauce cooling in a glass bowl

 
This recipe is courtesy of Epicurious, one of my favorite places to find cranberry recipes!  If you prefer not to use wine, use water or try orange juice! 

Now how do you eat this tasty sauce?  Why as many ways as you can imagine! 
  • Over a juicy breast of chicken
  • brushed over some pork ribs baking in the oven
  • spread on top of your favorite muffins
  • mixed into your morning oatmeal
  • stirred into some simmering beef stew
  • slathered over some baked yams

Get creative!

So next time you go grocery shopping, don't walk away from that bag of bright berries.  I know you've done it, I have too.  But I am more determined than ever to eat and enjoy the gifts Mother Nature offers me each season.  Here's to the humble cranberry!

How do you cook with cranberries?